When you select individual clips, or select portions of clips by dragging the Time Ruler, you automatically select all the events that fall within the designated time range. Sometimes you need finer control over which events are selected. For example, you might want to:
The Event Filter dialog box looks like this:
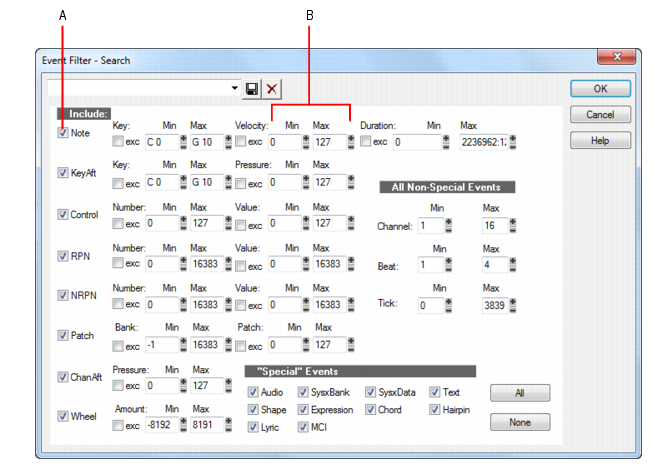
The event filter only accepts events that meet all the specified ranges. This means that a note event must fall within the pitch range, the velocity range, and the duration range in order to be included. The event filter can also be used to accept events that occur in a range of channel numbers, beats, and clock ticks.
You can choose either to include or
exclude the events that meet the specified criteria. To exclude events within the designated range and select the ones outside the designated range, check the
exc check box for that value range.
The event filter can also be used to identify several special event types: audio, System Exclusive events, Lyrics, MCI commands, envelope shades, and a few others. You do not enter a range of values for these special events; SONAR finds all events of the types you choose.
The All and
None buttons help you set up the event filter the way you want:
In any place in the event filter where you would normally enter a pitch string, you can also enter the pitch by pressing a key on your MIDI keyboard. Also, you can use the question mark in place of the octave number as a wild card. This lets the event filter accept a single note, regardless of the octave. For example, the pitch string C? will match a C in any octave.
The Edit > Select > By Filter command is used to refine a selection by applying an event filter to an initial selection. You can use this command any number of times to refine the selection even further. Before using this command, use any of the selection commands and tools to create an initial set of selected event. You can use the
Edit > Select > All command to select all events in the current view.
The Track view cannot display individual selected events. As a result, the Edit > Select > By Filter command will not necessarily change the appearance of the Track view. SONAR applies the event filter rule, but the change is not visible. However, once you change the selection in any way (for example, by clicking on a track number or by clicking in the Time Ruler), the effects of the event filter are erased. If you want to use the filter, you must choose
Edit > Select > By Filter again and click
OK to use the same filter values.
Suppose you recorded a keyboard riff on Track 1 but want to split the left and right hands apart into separate tracks so you can edit them separately. Suppose that all the right-hand notes are above C4. Here’s how to proceed:
The Process > Find/Change command is an extremely flexible way of manipulating the data parameters of events. It works something like the search-and-replace function in a word processor but with scaling rather than simple replacement.
This command uses two event filters. The first event filter lets you set up your search criteria. The second event filter is used to define the replacement value ranges. When an event satisfies the search criteria, its parameters are scaled between the search ranges and the replacement ranges. This permits transposition, inversion, key signature changes, and other operations to be accomplished with this one simple command.
In the second Event Filter dialog box, the check boxes and value ranges for beats and ticks are ignored. Only the replacement value ranges for the selected event types are used.
The Process > Find/Change command understands a wild card octave number in the second event filter to mean, “replace the original note with a different note in the original octave.” Using octave wild cards for both the search and replacement event filters lets you, for instance, change all E-flats to E-naturals, preserving the octave of each note.
A few examples will illustrate some of the many uses of the Process > Find/Change command. These examples apply to the note event type, though the command can be used on any type of event.